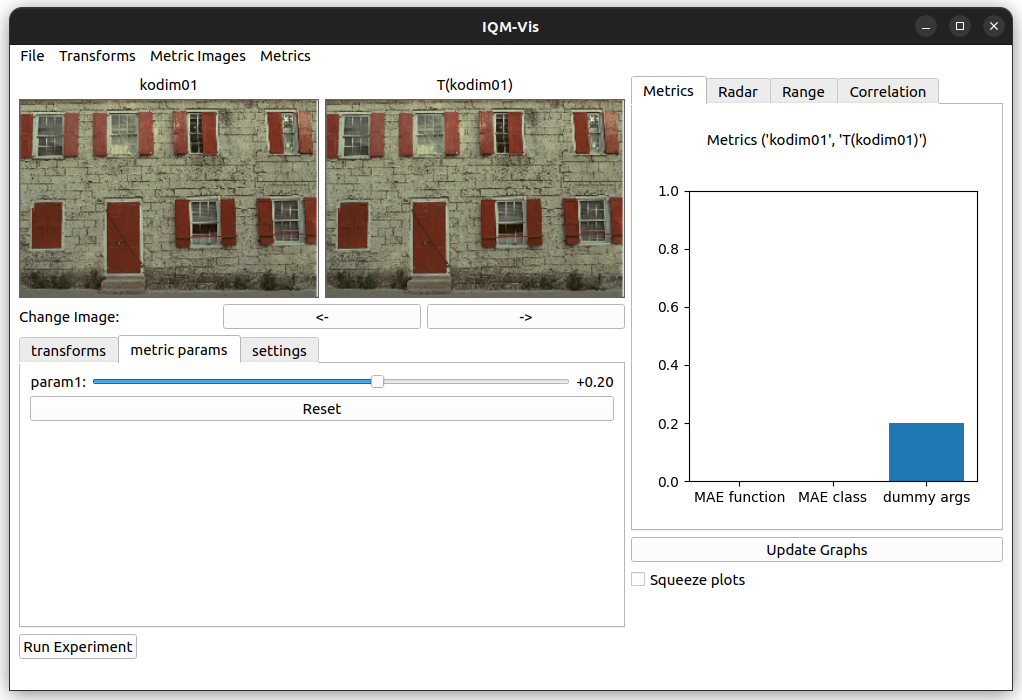
View the whole notebook: https://github.com/mattclifford1/IQM-Vis/tree/main/dev_resources/docs/notebooks/Tutorial_3-Advanced-Customisations.ipynb
Tutorial 3: Customisation Details
In this notebook we will expand on tutorial 2 by showing you exactly what form the transformations and IQMs need to be in.
Let’s start by importing the package.
[ ]:
import IQM_Vis
Metrics
A metric is defined as a callable object e.g. a function.
Custom metrics need to take arguments: - im_ref: the reference image (numpy array - float in the range 0-1) - im_comp: the comparison/distorted image (numpy array - float in the range 0-1) - **kwargs: peel off any extra key word arguments that might be called to the function
Metrics need to return a single value (float) with the score
We can make our own mean squared error function:
[2]:
import numpy as np
def custom_MAE_function(im_ref, im_comp, **kwargs):
    L1 = np.abs(im_ref - im_comp)
    return L1.mean()
We can also define metrics as class objects. This is useful if you need to store attributes. You will still need to class to be callable like the function above.
[3]:
class custom_MAE_class:
    def __init__(self, att=0):
        self.att = att

    def __call__(self, im_ref, im_comp, **kwargs):
        L1 = np.abs(im_ref - im_comp)
        return L1.mean()
Extra key word arguments can be included if the metric needs to take them. Make sure they have a default value and you can add them as parameters to the IQM-Vis UI
[4]:
def dummy_args(im_ref, im_comp, param1=0, **kwargs):
    # now we can use param here
    score = custom_MAE_function(im_ref, im_comp)
    return score + param1
Now we can add them to the dictionary to pass to the IQM-Vis UI as shown in tutorial 2. Note that the class metric need to initialised.
[5]:
metrics = {'MAE function': custom_MAE_function,
          'MAE class': custom_MAE_class(),
          'dummy args': dummy_args}
We also need to tell IQM-Vis about param1 to be used by our dummy_args function
[6]:
params = {'param1': {'min':-1.0, 'max':1.0, 'init_value': 0}}
Transformations
Transforms/distortions are callable with the following arguments: - image: image to be transformed (numpy array - float in the range 0-1) - param: value of the parameter of the transformation
Transforms need to return a numpy array of the same shape as the image input and be within the bounds 0-1.
For example we can make our own brightness adjuster, note the parameter ‘value’ can be called anything:
[7]:
def custom_brightness(image, value=0):
    return np.clip(image + value, 0, 1)
Then we put in a dictionary with the parameter range to tell the UI later
[8]:
transformations = {'brightness':{'min':-1.0, 'max':1.0, 'function':custom_brightness}}
Making the UI
Now make the UI as shown in tutorial 2
[ ]:
images = ['/home/matt/datasets/kodak/kodim01.png',
          '/home/matt/datasets/kodak/kodim02.png']

IQM_Vis.make_UI(transformations=transformations,
                image_list=images,
                metrics=metrics,
                metric_params=params)
